Participant Guide — Hardware: Seeed Studio XIAO ESP32-S3 + Wio-SX1262 LoRa Module
- Project 1: OUI SPY — Surveillance Detection & RF Fox Hunting
- Project 2: Meshtastic — Off-Grid Encrypted Mesh Messaging
All tools in this guide are open-source and intended for security research, education, and privacy auditing.
Welcome to the LoRa Radio CTF
Welcome, Agent. You’re about to get hands-on with real radio hardware — no simulations, no virtual labs. You’ll build a device from components, flash firmware onto it, and use it to detect wireless signals that most people never notice.
This Capture The Flag event is built around two open-source projects that run on the same tiny board. By the end, you’ll have assembled your own LoRa-capable device, learned to flash different firmware onto it, detected surveillance hardware via Bluetooth, hunted down a hidden radio transmitter, and sent encrypted messages over a decentralized mesh network that works without cell towers, Wi-Fi, or the internet.
No prior radio or embedded-systems experience is required. Everything you need to know is in this guide.
What is LoRa?
LoRa stands for Long Range. It’s a radio communication technology designed for low-power devices that need to send small amounts of data over distances of several kilometers. Unlike Wi-Fi or Bluetooth, which work over short distances, LoRa operates on sub-gigahertz frequencies (around 915 MHz in North America) and can reach 2–20+ km depending on terrain and antenna placement.
LoRa is license-free in most regions, meaning you can transmit without a ham radio license or special permits. It trades speed for distance: you won’t be streaming video over LoRa, but you can send text messages, GPS coordinates, and sensor telemetry reliably across remarkable distances.
Hardware Kit
| Component | Description |
|---|---|
| XIAO ESP32-S3 Base | Dual-core 240 MHz microcontroller with Wi-Fi, BLE 5.0, 8 MB Flash, 8 MB PSRAM. This is the brain of your device. |
| Wio-SX1262 Hat | LoRa radio module (862–930 MHz). Snaps onto the XIAO via a board-to-board connector. Handles all long-range radio communication. |
| OLED Display | Small I²C screen for showing status, RSSI readings, detection alerts, and Meshtastic node information. |
| Piezo Buzzer | Audio feedback for detections and proximity tracking. Connects to GPIO 3. |
| Breadboard | Solderless prototyping board for assembling all components without soldering. |
| Jumper Wires | Pre-cut wires for making connections on the breadboard. |
| USB-C Cable | Data + power cable for connecting to your laptop. Required for flashing firmware. |
| LoRa Antenna | U.FL or IPEX antenna for the Wio-SX1262. Must be connected before powering on. |
⚠ Important: Always Attach the Antenna. Before powering on the device with LoRa firmware, always make sure the antenna is securely connected to the Wio-SX1262 module. Transmitting without an antenna can permanently damage the radio chip.
Phase 0: Hardware Assembly
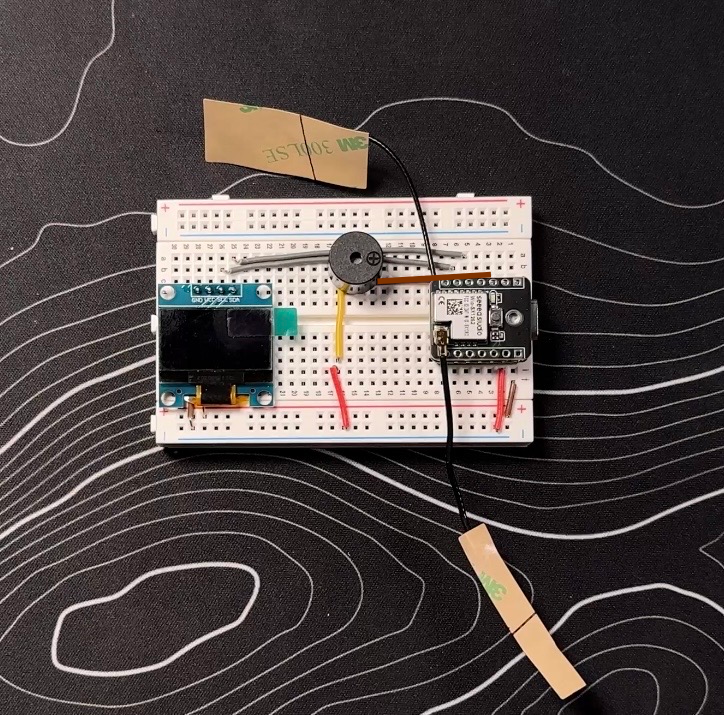
Your first task is to assemble the hardware on the breadboard. Follow these steps carefully, and reference the breadboard layout diagram below.
Step 1: Prepare the XIAO ESP32-S3 and Wio-SX1262
- On the ESP32 board, attach the wide antenna to the bottom-left side.
- The Wio-SX1262 LoRa module connects to the XIAO ESP32-S3 via a small board-to-board (B2B) connector on the underside.
- Peel off any protective tape from the connector area, align the boards, and press them together firmly until they click.
- No soldering required.
Step 2: Seat the Combined Board on the Breadboard
Place the XIAO + SX1262 assembly into the breadboard so the pins straddle the center channel. Make sure it’s seated firmly and the USB-C port is accessible at the edge of the board.
Step 3: Connect the OLED Display
The OLED display communicates via I²C. Connect the following pins from the display to the XIAO using jumper wires:
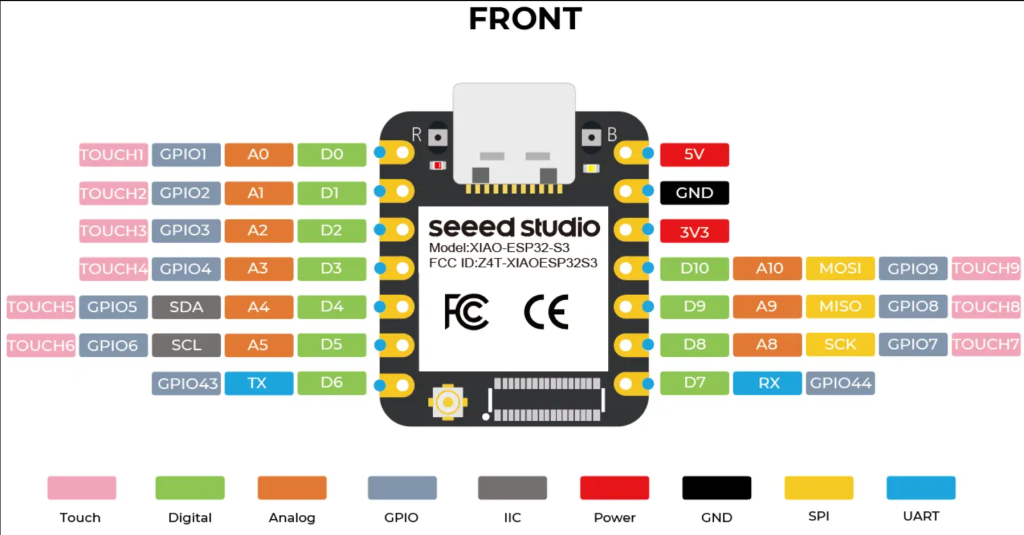
- VCC → 5V on the XIAO
- GND → GND on the XIAO
- SDA → SDA (GPIO 5) on the XIAO
- SCL → SCL (GPIO 6) on the XIAO
Step 4: Connect the Piezo Buzzer
The buzzer provides audio feedback for OUI SPY detections. Connect it as follows:
- Positive lead (+) → GPIO 3 (D2) on the XIAO (brown line cable in the reference photo)
- Negative lead (–) → GND on the XIAO
Step 5: Attach the Antenna
Carefully connect the LoRa antenna to the U.FL connector on the Wio-SX1262 module. The connector should snap into place with gentle pressure — do not force it.
Step 6: Verify Your Build
Before plugging in, double-check all connections against the reference breadboard layout. Confirm that power (5V) and ground (GND) are not shorted, the display wires are on the correct I²C pins, the buzzer is on GPIO 3, and the antenna is attached.
Now that your device is set up, head to the “Darknet-NG 15 DIY Badge Level 2” category of challenges.
Want a video walkthrough? Watch it here →
Checkpoint: Once your build is verified, plug the USB-C cable into the XIAO and connect it to your laptop. You should see a new serial device appear. If nothing happens, try holding the BOOT button while plugging in the cable.
Project 1: OUI SPY — Surveillance Detection & Fox Hunting
What is OUI SPY?
OUI SPY is an open-source, multi-mode BLE and Wi-Fi intelligence firmware created by ColonelPanicHacks. It transforms your XIAO ESP32-S3 into a surveillance-detection and RF-tracking tool. A single firmware flash gives you four distinct operating modes, selectable from a Wi-Fi boot menu — no reflashing needed to switch between them.
GitHub: github.com/colonelpanichacks/oui-spy-unified-blue
The Four Modes
Mode 1: Detector
A BLE scanning tool that continuously monitors for specific target devices by OUI prefix, MAC address, or device name pattern. When a match is found, the buzzer sounds and the onboard NeoPixel LED flashes. You configure your watchlist targets through a web dashboard served over Wi-Fi.
Mode 2: Foxhunter
An RSSI-based proximity tracker. Lock onto a target BLE device by its MAC address, then physically move around to find it. As you get closer, the buzzer beeps faster — like a Geiger counter for Bluetooth. The beep cadence ranges from a painfully slow pulse at long range to a machine-gun rattle when you’re right on top of the device.
Mode 3: Flock-You
Detects Flock Safety surveillance cameras, Raven gunshot detectors, and related monitoring hardware using BLE-only heuristics. Detection methods include MAC prefix matching against 42 known Flock Safety OUI prefixes, BLE device name pattern matching, manufacturer company ID detection, and Raven service UUID fingerprinting. All detections can be GPS-tagged using your phone and exported as JSON, CSV, or KML for Google Earth.
Mode 4: Sky Spy
Passive drone detection via FAA Remote ID (Open Drone ID) Wi-Fi beacon monitoring. Listens in promiscuous mode for ASTM F3411-compliant broadcasts and extracts drone telemetry including serial numbers, GPS coordinates, altitude, speed, and heading. Tracks up to 8 drones simultaneously.
Flashing OUI SPY
OUI SPY uses a Python-based flash script that wraps esptool. You’ll need Python 3 installed on your laptop.
- Open a terminal on your Linux laptop. If you can’t get it working, go see Gater_Byte at the DEVOPS booth and ask to flash the firmware.
- Install the required Python packages:
pip install esptool pyserial - Connect the XIAO ESP32-S3 to your laptop via USB-C. If the device isn’t recognized, hold the BOOT button while plugging in the cable (bottom board, right side on USB, next to the 5V GPIO).
- Clone or download the OUI SPY repository from GitHub: github.com/colonelpanichacks/oui-spy-unified-blue
git clone https://github.com/colonelpanichacks/oui-spy-unified-blue.gitcd oui-spy-unified-bluepython -m venv venv. ./venv/bin/activatepython -m pip install esptool pyserialpython flash.py- The script will auto-detect your board and flash the unified firmware. When it completes, the device will reboot into the boot selector.
Tip: Full Erase. If you’re reflashing over existing firmware, use
python flash.py --erasefor a clean install. This wipes all saved settings and starts fresh.
Using OUI SPY
When OUI SPY boots for the first time, it creates a Wi-Fi access point. Each mode has its own AP name and credentials:
| Mode | SSID | Password | Dashboard |
|---|---|---|---|
| Boot Selector | oui-spy | ouispy123 | 192.168.4.1 |
| Detector | snoopuntothem | astheysnoopuntous | 192.168.4.1 |
| Foxhunter | foxhunter | foxhunter | 192.168.4.1 |
| Flock-You | flockyou | flockyou123 | 192.168.4.1 |
| Sky Spy | (none) | — | Serial only |
To get started:
- Power on the device. It will start in Boot Selector mode and create the
oui-spyWi-Fi network. - On your phone or laptop, connect to the
oui-spynetwork (password:ouispy123). - Open a browser and navigate to
192.168.4.1to see the mode selector dashboard. You can set a new SSID with your team name at the bottom of the screen, click “Set,” and your device will reboot with your new custom name. - Select a mode. The device saves your choice, reboots, and starts in that mode.
- To return to the boot selector at any time, hold the BOOT button (bottom board, right side on USB, next to the 5V GPIO) for 2 seconds.
⚠ Wi-Fi Auto-Connect Warning. When you switch modes, your phone may auto-reconnect to a previously saved OUI SPY network from the wrong mode. If you can’t reach the dashboard after switching, forget the old network in your Wi-Fi settings and connect to the new one.
Project 2: Meshtastic — Off-Grid Encrypted Mesh Messaging
What is Meshtastic?
Meshtastic is a free, open-source project that turns inexpensive LoRa radios into a decentralized, encrypted mesh communication network. It lets you send text messages, share GPS locations, and transmit sensor data over distances of several kilometers — all without cell towers, Wi-Fi infrastructure, or the internet. No monthly fees, no accounts, no central servers.
Here’s how it works: you type a message in the Meshtastic app on your phone. Your phone sends that message to your radio device via Bluetooth. The radio then broadcasts it using LoRa. If your recipient is out of direct range, other Meshtastic devices in between automatically relay your message, hopping it from node to node until it reaches the destination. The system handles encryption, delivery confirmation, and retries automatically.
Every device on the network is called a node. Each node can send, receive, and relay messages for other users. The more nodes in an area, the stronger and more resilient the network becomes. This is a true mesh: there’s no single point of failure.
Why Does This Matter? In disaster scenarios, at large events where cell networks are overwhelmed, in remote backcountry, or in any situation where traditional communication infrastructure is unavailable or untrustworthy, Meshtastic gives you a way to communicate that you control. Your hardware, your network, your encryption keys.
Key Concepts
- LoRa: The radio protocol. Long range, low power, low data rate. Think text messages, not video calls.
- Mesh Network: Every node relays messages for other nodes. No central infrastructure needed.
- Node: Any device running Meshtastic firmware. Your XIAO + SX1262 will be a node.
- Channel: A named, encrypted group. Nodes on the same channel with the same encryption key can communicate.
- Hop Limit: The maximum number of times a message can be relayed before it expires. Default is 3 hops.
- MQTT: An optional internet bridge that connects isolated meshes together over the internet. Not needed for this CTF.
Flashing Meshtastic
Meshtastic uses a browser-based web flasher that works with Chrome or Edge. No software installation is required on your laptop.
- Open Chrome or Edge on your laptop and navigate to flasher.meshtastic.org
- Connect your XIAO ESP32-S3 to the laptop via USB-C. If the device isn’t detected, try holding the BOOT button (bottom board, right side on USB, next to the 5V GPIO) while plugging in the cable to enter bootloader mode.
- In the web flasher, select the device as Seeed Xiao ESP32-S3 under community-supported devices.
- Select the latest stable firmware version.
- Check the box for Full Erase and Install to ensure a clean flash (especially important if the device previously had OUI SPY firmware on it).
- Click Flash and wait for the process to complete. The device will reboot automatically when finished.
Tip: Data Cable Required. Make sure you’re using a USB-C cable that supports data transfer, not a charge-only cable. If the flasher doesn’t see your device, the cable is the most common culprit.
Configuring Your Meshtastic Node
Once flashed, your device is a live Meshtastic node. Configure it using one of these methods:
Option A: Meshtastic Phone App (Recommended)
- Install the Meshtastic app from the Google Play Store or Apple App Store on your phone. Example setup videos: Android or iOS.
- On your phone, enable Bluetooth and open the Meshtastic app.
- The app will scan for nearby devices. Your node will appear as something like
Meshtastic_XXXX(where XXXX is the last four hex digits of its MAC address). The default pairing PIN is123456. - Once connected, you can set your node name, configure the LoRa region (set to US for North America / 915 MHz), join or create channels, and view other nodes on the mesh.
Option B: Web Client
If the device is connected to your laptop via USB, you can also configure it from a browser at client.meshtastic.org. Connect via the serial port option.
- You should see a serial device and the option to click “Connect.”
- This pops up a “Serial selection” window in your browser — choose the one that says “Seeed XIAO S3” and click connect.
- In the new window, click on “Settings.”
- Under the “Region” drop-down, click “US,” then click “Save” in the top-right corner.
- Your device will reboot — this can take a minute or two.
- In the left menu, click “Messages.”
- You’ll see that under the Channels section you have only one channel, called “Primary.”
- At the bottom of the screen you have the option to send a message.
Using Meshtastic in the CTF
- Send Messages: Use the app to send text messages to the mesh. All nodes on the same channel will receive them.
- Share Location: If GPS is available (via phone or an optional GNSS module), your node can broadcast its position to the mesh.
- View the Mesh: The app shows all nodes it has heard, their signal strength, distance (if GPS is available), and last-heard time.
- Range Test: Walk around the venue and see how far your messages can travel. Each message shows the number of hops it took to reach you.
Troubleshooting
Device Not Recognized by Computer
- Try a different USB-C cable (must be data-capable, not charge-only).
- Hold the BOOT button (bottom board, right side on USB, next to the 5V GPIO) while plugging in the USB cable to force bootloader mode.
- On Windows, you may need to install the ESP32-S3 USB driver from the Espressif website.
- On macOS, check System Information > USB to see if the device appears.
Flash Fails or Times Out
- Make sure no other application (serial monitor, another flasher) has the serial port open.
- Try the
--eraseflag for a full flash erase before writing new firmware. - Use a shorter USB cable or plug directly into the laptop (avoid USB hubs).
Cannot Reach the OUI SPY Dashboard
- Confirm you’re connected to the correct Wi-Fi network for the current mode (see the AP table above).
- Forget all saved OUI SPY networks and reconnect to the one matching the active mode.
- Disable mobile data on your phone so it doesn’t route traffic away from the AP.
Meshtastic App Cannot Find the Node
- Make sure Bluetooth is enabled on your phone.
- Power-cycle the device by unplugging and re-plugging the USB cable.
- The default pairing PIN is 123456.
- If the node was previously paired to a different phone, reset the device and re-flash.
No LoRa Communication Between Nodes
- Verify that the antenna is attached to the Wio-SX1262 module.
- Confirm both nodes are set to the same LoRa region (US / 915 MHz).
- Ensure both nodes are on the same channel with the same encryption key.
- Try moving to an open area with line of sight between nodes.
Resources & Links
- OUI SPY Unified Firmware: github.com/colonelpanichacks/oui-spy-unified-blue
- OUI SPY Ecosystem (all firmwares): github.com/colonelpanichacks/oui-spy
- Meshtastic Project: meshtastic.org
- Meshtastic Web Flasher: flasher.meshtastic.org
- Meshtastic Web Client: client.meshtastic.org
- Meshtastic App (Android): Google Play Store → search “Meshtastic”
- Meshtastic App (iOS): Apple App Store → search “Meshtastic”
- XIAO ESP32-S3 + Wio-SX1262 Kit: seeedstudio.com
- Seeed Wiki (Hardware Setup): wiki.seeedstudio.com
- IEEE OUI Lookup: standards.ieee.org/products-services/regauth/oui
Parts List
| Component | Link |
|---|---|
| XIAO ESP32-S3 with Wio-SX1262 | seeedstudio.com |
| OLED Display | amazon.com |
| Piezo Buzzer | amazon.com |
| Breadboard | amazon.com |
| Jumper Wires | amazon.com |
| USB-C Cable | amazon.com |
| LoRa Antenna | amazon.com |